|
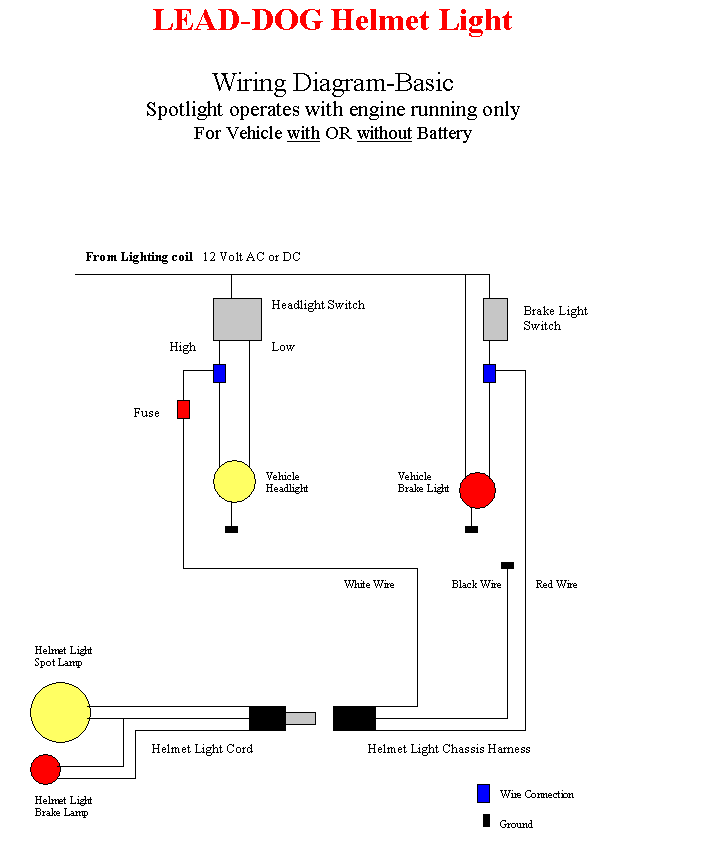
Wiring Instructions - Basic
Vehicles with or without a battery
Spotlight Operates with Vehicle High Beam Switch
ALWAYS CONSULT FACTORY WIRING DIAGRAM OR DEALER FOR PROPER WIRING LOCATIONS
- Determine convenient location for female jack of Chassis Harness to hang from handlebars
or other location in front of rider so the male/female connection may be disconnected
easily when pulled from any direction without interference. Secure the harness with wire
ties or other means that will hold the female jack in place.
- Chassis Harness wire splice locations will be determined by vehicle wiring. Some splices
may be made at the handlebars. This location will require some of the Chassis Harness to
be cut off and discarded. Other splices will be made farther down the wiring system. Route
the Chassis Harness through handlebars, dash, and/or cowling to the desired vehicle light
wiring splice location securing with wire ties.
SOLDER ALL WIRING SPLICES AND PROTECT
WITH SHRINK-WRAP OR ELECTRICAL TAPE TO PREVENT SHORTING. DUE TO POSSIBLE LACK OF POSITIVE
CONNECTION, QUICK SPLICE OR OTHER “CRIMP” TYPE SPLICES ARE NOT RECOMMENDED.
- Locate headlight high/low beam switch AND headlight HIGH BEAM wire. VERIFY WITH FACTORY
WIRING DIAGRAM. Splice white(fused) spotlight wire of Chassis Harness between high/low
beam switch and the headlight.
- Locate brake light switch AND brake light wire. VERIFY WITH FACTORY WIRING DIAGRAM.
Splice red wire of Chassis Harness to brake light wire between switch and light. Brake
light does not have to be wired for spotlight to work. NEVER wire so that brake bulb is
always on, bulb is only for intermittent use.
- Locate sufficient ground wire in system or grounding attach point on vehicle. VERIFY
GROUND IS AN ACCEPTABLE LOCATION FROM FACTORY WIRING DIAGRAM AND/OR FACTORY OWNERS MANUAL.
Either splice black wire of Chassis Harness into ground wire OR attach wire securely to
vehicle ground location with a screw or bolt.
The LEAD-DOG Helmet Light spotlight and glowing tail light housing will operate when
the high beam of the vehicle is switched on. Brake light will activate when brakes are
applied.
Click this image to enlarge the basic wiring diagram:
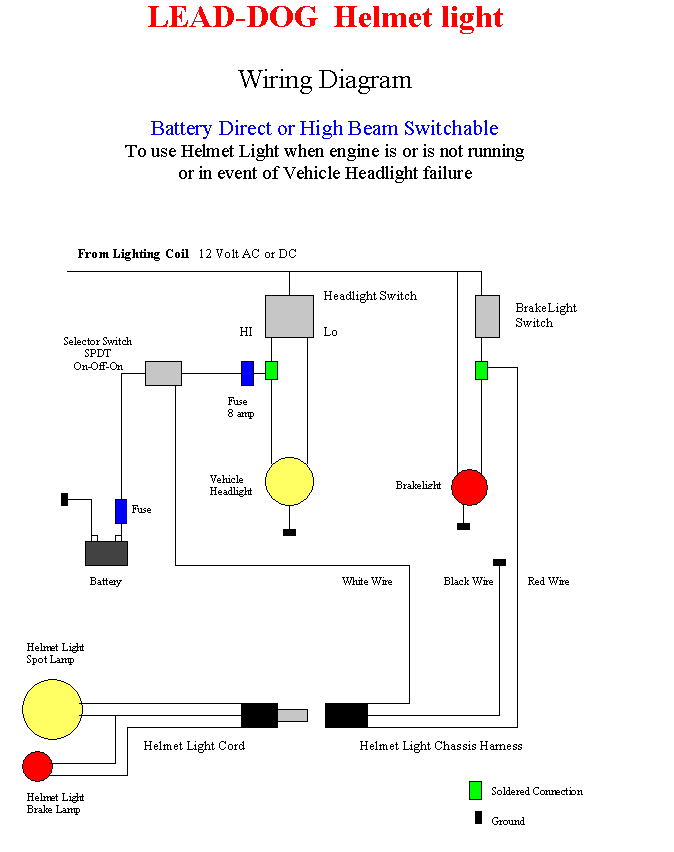
Wiring Instructions – Battery Direct
Vehicles WITH a battery ONLY
On/Off/On switch and wire NEEDED – NOT SUPPLIED
Spotlight operates with/without engine running
ALWAYS CONSULT FACTORY WIRING DIAGRAM OR DEALER FOR PROPER WIRING LOCATIONS
- Determine convenient location for female jack of Chassis Harness to hang from handlebars
or other location in front of rider so the male/female connection may be disconnected
easily when pulled from any direction without interference. Secure the harness with wire
ties or other means that will hold the female jack in place.
- Chassis Harness wire splice locations will be determined by vehicle wiring. Some splices
may be made at the handlebars. Others will be made farther down the wiring system. Route
the Chassis Harness through handlebars, dashes, and/or cowlings to the desired vehicle
light wiring splice location and secure with wire ties.
SOLDER ALL WIRING SPLICES AND
PROTECT WITH SHRINK-WRAP OR ELECTRICAL TAPE TO PREVENT SHORTING. DUE TO POSSIBLE LACK OF
POSITIVE CONNECTION, QUICK SPLICE OR OTHER “CRIMP” TYPE SPLICES ARE NOT
RECOMMENDED.
- OBTAIN an appropriate on/off/on switch (not included) and mount to handlebars, vehicle
dash, panel, or cowling. Determine distance from battery to on/off/on switch. Cut this
length off of the white(fused) wire from Chassis Harness including the fuse. Connect
remaining white wire from Chassis Harness to center pole of on/off/on switch, you may need
to add additional 18-gauge wire here. Connect the cut portion of wire with the fuse from
the positive side of the battery to one of the remaining poles of the on/off/on switch.
Locate headlight high/low beam switch AND headlight HIGH BEAM wire. VERIFY WITH FACTORY
WIRING DIAGRAM. Connect a length of 18-gauge wire between the remaining pole of the
on/off/on switch and high beam wire.
- Locate brake light switch AND brake light wire. VERIFY WITH FACTORY WIRING DIAGRAM.
Splice red wire of chassis Harness to brake light wire between switch and light. Brake
light does not have to be wired for spotlight to work. Never wire so that the brake light
is always on, bulb is only for intermittent use.
- 5) Locate sufficient ground wire in system or grounding attach point on vehicle. VERIFY
GROUND IS AN ACCEPTABLE LOCATION FROM FACTORY WIRING DIAGRAM AND/OR FACTORY OWNERS MANUAL.
Either splice black wire of Chassis Harness into ground wire OR attach wire securely to
vehicle ground location with a screw or bolt.
One “on” leg of on/off/on
switch operates LEAD-DOG Helmet Light spotlight continuously, in other “on”
position, spot light operates with high beam switch.
Click this image to enlarge the battery wiring diagram:

Back
|
